Stereoscopes and Stereograms


Start with one square of random dots on the left.

Copy this square to the right.


Shift some dots in the left square over.
Fill in with new random dots.
Click the arrows below to move the circle.
← →

Introduction
As you learned in the activity on Binocular Disparity, when you view a three-dimensional scene, your eyes receive two slightly different images of the world. Your brain then “fuses” these images together to create a sense of depth called stereopsis. However, if you are viewing a two-dimensional picture of a scene, whether printed in a book, hanging in a museum, or displayed on a computer monitor, your two eyes do not receive different images of the picture, so you don’t get the same sense of depth that you would if you were viewing the scene in person.
Nonetheless, there are techniques for producing stereograms—two-dimensional images that, when viewed under special circumstances, trick the brain into computing disparity information so that a sense of depth is created. This activity illustrates several of these techniques, including one, the random dot stereogram, which has played an important role in scientific research on stereopsis.
Instructions
Click on the links at left to jump to different parts of the activity
Each part contains multiple images. Click on the images to toggle between them (image numbers referred to in the explanations will appear in the upper right of the yellow area on the screen).
The first time you do this activity you should probably go through the parts in order from top to bottom.
Stereoscopes
The most straightforward way to produce a sense of three-dimensional depth from two-dimensional images is to take a picture of a scene using a special stereoscopic camera such as the Russian-made “Sputnik” model shown in Image 1. The left and right lenses of the Sputnik take two pictures of a scene from roughly the positions of the photographer’s two eyes (the middle lens is for the camera’s viewfinder).
Both of these pictures look just like a normal two-dimensional photos, and both can be viewed simultaneously using a stereoscope: a special device for showing one image to the left eye and a different image to the right eye. Image 2 shows a very early stereoscope, developed by Sir Charles Wheatstone in the 1840s. The viewer’s nose is positioned so it just touches the intersection of the two mirrors. The left image is then reflected into the left eye and the right image into the right eye, and voila! the scene pops out in 3D.
The most common modern stereoscope is the View-Master, which holds seven pairs of stereo images in the reel shown in the bottom right of Image 3. An early-model View-Master (from 1945) is shown in the upper right of the image and a 1960s version in the center. When the observer looks through the View-Master, each eye sees a slightly different angle of a scene, creating the impression of stereoscopic depth.
Another way to deliver different images to the two eyes, popular in 1950s horror films, is to overlay the two images on top of each other, but pass one image through a red filter and the other through a blue filter. The overlaid image must then be viewed through special glasses such as those illustrated in Image 4. The right lens blocks all red light from coming into the right eye, so that eye only sees the part of the image in blue. Conversely, the left lens blocks blue light, letting only the red image though to the left eye. The viewer’s brain then fuses the images together, and characters in the movie appear to pop out of the screen in 3D.
Modern 3D movies, such as Avatar, use a more technologically advanced version of the red and blue stereo glasses. Instead of red and blue filters, polaroid filters are used to admit different images to the two eyes. Early versions of polaroid stereo filter glasses used horizontal and vertical polarization of the images for the two eyes, which worked fine as long as the viewer kept her head perfectly upright. However, if the viewer tilted her head to the left or right, the glasses no longer filtered the polarized movie frames correctly and the sense of 3D was ruined. New versions of the polaroid stereo filter glasses use clockwise and counter-clockwise polarization of the images, which is much more robust to head tilt and leads to a more enjoyable 3D experience.
The Poor Man’s Stereoscope: Free Fusing (page 1)
Image 1 in this section shows a pair of pictures that mimic the right- and left-eye views of a door at the end of a hallway. If you had a Wheatstone stereoscope you could pop these pictures in and see the scene in 3D. But it is also possible to view this stereogram without the aid of a stereoscope, using a technique called free fusing.
Hold your index finger up about halfway between your eyes and the computer monitor. Focus your gaze on your finger and then, without changing focus, shift over to viewing Image 1. You will now be viewing the image cross-eyed (don’t worry, your eyes won’t get stuck in this position despite what your mother told you).
You should now be seeing three hallways, rather than the two that are actually there on the monitor. The middle image is the product of your brain’s efforts to fuse the two hallways together, and at first your brain will probably only partially succeed—the middle image will be blurry, or you might actually see four of them. Try to let your eyes relax just enough so that you see three and only three clear hallways (it may take a few minutes to “get it”—be patient). Concentrate on the middle of the three images and when you succeed, you should perceive it in 3D.
The Poor Man’s Stereoscope: Free Fusing (page 2)
Fuse the two pictures in Image 1 again, then try an experiment. Without changing your gaze at all, close your right eye while keeping your left eye open. If you see the hallway in depth (with both eyes open), you will find that your left eye is focused on the picture to the right and your right eye is focused on the picture to the left (you should confirm this for yourself). This is how free fusing, as well as other types of stereograms that don’t require a stereoscope, work. The right-hand picture falls on your left fovea, while the left-hand picture falls on your right fovea. Recall that the foveas are corresponding retinal points, so your brain always attempts to fuse the images falling on the foveas together. The fusion results in stereopsis, and we see the hallway as receding into the computer monitor.
The technique we’ve been using so far is called cross fusing, because you cross your eyes slightly to see the picture in 3D. It is also possible to view stereograms with the parallel fusing technique, in which the eyes are relaxed so that their gaze directions are parallel to each other. If you’ve encountered the now-famous “Magic Eye” stereograms in the past, you have at least attempted to use parallel fusing. Image 2 shows the hallway scene set up for parallel fusing (can you tell what’s changed?). To see this image in depth, try to focus your gaze at a far-away point, deep inside the computer monitor. You should again see three images, and if you can get the center one to come into focus, you will have achieved parallel free fusion. If you’re having trouble “getting it,” click here for an excellent set of instructions for the first-time fuser.
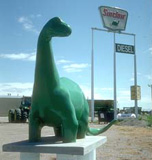
Image 3 and Image 4 are cross- and parallel-fusion versions of a real-world scene photographed with a stereoscopic camera. Fuse them just as you did with the hallway pictures, and you’ll see the dinosaur popping out in depth. It’s difficult to see the difference between the left- and right-eye views in this picture; go to Image 5 to see the two views alternating back and forth in the center of the screen.
“Wallpaper” Stereograms
The images in this section show another type of stereogram in which stereopsis can be achieved by forcing your two eyes to focus on different portions of the same picture. Image 1 shows a cross-viewing version and Image 2 a parallel-viewing version of the stereogram. To see the image in depth, cross (for Image 1) or diverge (for Image 2) your eyes so that you see three instead of two crosses in the middle of the figure. Once the center cross comes into sharp focus, you should see each of the four shapes in the image “floating” in different depth planes. The depth order will depend on whether you are cross- or parallel-viewing. For Image 1, the green squares will appear in front, followed by the red triangles, purple stars, and blue ovals. For Image 2, the depth relations will be reversed (the green squares will appear to be farthest away, with the blue ovals appearing closest).
In Images 1 and 2, the stereopsis information is augmented by a pictorial depth cue, occlusion (e.g., the squares partially cover the ovals in Image 1, while the squares are covered by the ovals in Image 2, in agreement with the depth relations suggested by stereopsis). Image 3 shows a version of the stereogram in which the occlusion cues are removed, to prove that stereopsis alone can produce a sense of depth. Note that when viewing this image normally, all the shapes appear to be on the same plane. But if you cross or diverge your eyes, the shapes will separate in depth just as they did in Images 1 and 2 (Image 3 works with either cross or parallel viewing).
Image 4 shows a close-up of part of the stereogram to illustrate how wallpaper stereograms “work.” Although each row of shapes appears to be more or less evenly spaced, Image 4 reveals that the squares are actually separated by a slightly larger distance (58 pixels on the screen) than the ovals (52 pixels). Now go back to Image 1. Think about what happens when you cross your eyes such that the left-hand cross falls on the right fovea while the right-hand cross falls on the left fovea. The squares on which the crosses are superimposed will be falling on corresponding points on the two foveas. But as we learned from Image 4, the ovals just below the squares are separated from each other by a different distance than the squares, so the ovals will be falling on disparate retinal points. As you have already learned, disparity produces stereopsis, and this is why the ovals appear to be in a different depth plane than the squares.
Random Dot Stereograms
Vision scientists have puzzled over stereograms ever since Wheatstone introduced them in the 1800s. It was initially thought that the visual system sees depth in these images by first recognizing the various objects in each eye separately, and then matching each object in the left eye with the corresponding object in the right. This theory of stereopsis was seriously challenged in the 1960s with the discovery of the random dot stereogram (RDS). This section of the activity describes how RDSs are produced and why they’ve been featured so prominently in recent vision research.
Image 1 shows nothing more or less than a square-shaped collection of random black and white dots. The first step in constructing an RDS is to make a copy of the square and move it beside the original, as illustrated in Image 2. Next, some of the dots in one of the squares are shifted over one way or the other. In our demonstration, a circular patch of dots in the left-hand square is shifted to the right in Image 3. Finally, a new set of random dots is filled in behind the shifted area, as shown in Image 4.
As you can see, when viewed normally there is no indication that the completed RDS contains any depth information at all. Indeed, had you not seen the transformation in Images 2–3, you would be hard pressed to find any differences between the two squares. But if you can free-fuse the two squares together, you will see a convincing stereoscopic effect. Parallel fusion produces the impression of a small circle floating above the square, while cross fusion will result in a circular hole in the square. (While viewing Image 4, click the arrows below to move the circle manually right and left. Move the circle after you have fused the squares to see it move both in the picture plane and in depth simultaneously. Before you start, be sure to click on the bottom of the yellow portion of the page.)
The RDS phenomenon provides convincing proof of two important facts about stereopsis. First, binocular disparity alone is sufficient to produce a convincing sense of depth. There are obviously no pictorial depth cues available in the RDS; in fact, you don’t see a picture at all in the RDS until after disparity information is calculated by fusing the two squares. This leads to the second important fact: Object recognition need not precede stereopsis, as scientists once thought. Apparently, the visual system uses some algorithm for computing disparity information that does not depend on having first decided where the objects in the image are.
“Magic Eye” Stereograms
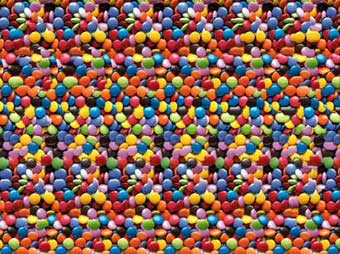
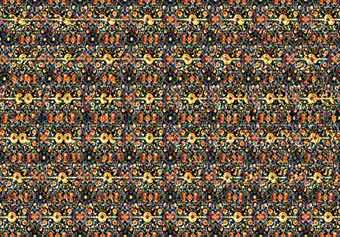
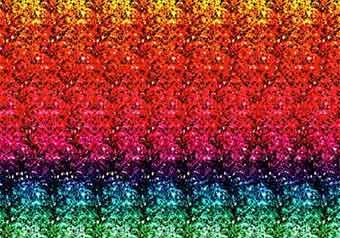
Perhaps the most fascinating type of stereogram, known in popular culture by the trademark name “Magic Eye,” combines the principles of wallpaper and random dot stereograms. Image 1 shows a classic and easy-to-perceive Magic Eye stereogram. The candies in this image serve as random dots. Unlike in simple random dot stereograms, however, the pattern of random elements in Magic Eye stereograms repeat left-to-right across a single image. If you look closely, you can see the repeating pattern of candies in Image 1.
To see the hidden 3D image in a Magic Eye stereogram, relax your eyes (most, including the ones shown here, are designed for parallel fusing) until the repeating elements in the picture fuse together. The blue circles above the stereogram serve as a fusion crutch: If you diverge your eyes until you see three perfectly focused blue circles, they will be perfectly adjusted to fuse the image below. In Image 1 you should see 11 circles floating above the candies; Image 2 and Image 3 contain a hidden spring and a hidden planet, respectively. Web Essay 6.2 contains a number of links to pages containing enough Magic Eye-type stereograms to keep you happily fusing for weeks.